
I’m not going to lie, learning how to use flash and speedlights in your digital photography can be quite an undertaking. However, learning how to use one is photography 101. This article is meant to help out beginners who need some assistance wrapping their heads around the subject. It seems stressful at first, but don’t worry! Once you understand some of the basics about digital photography and flash, things will start to fall into place. Bear with me, this might be a bit confusing at first… but I’m sure you’ll get the hang of it!
First and foremost, why would you want to use a speedlight instead of the the built-in camera flash? We go over some of those details in this article about using flash. In short, the onboard camera flash does not provide powerful light, nor is it easy to modify. There is no question that you’re going to get unflattering photos with the built-in flash.
TTL and Manual
There are two main flash modes, TTL and and Manual.
TTL (ETTL): In essence, this is auto mode. TTL stands for "through the lens", meaning that the flash determines the settings for a correct exposure based off the light levels coming in through the lens.
Manual: Exactly how it sounds. Manual mode means that you control the settings and how they all affect each other. Just like manual mode on a digital camera.

Here comes the part that might be a little difficult to wrap your head around. If you shoot on TTL, changing the settings on your camera will not change the flash output. However, if you shoot on manual, it does change. In TTL, the flash is adjusting the power based off what it assumes is needed for the correct exposure. Similar to shooting in auto mode on a DSLR - no matter what you change, the camera makes the necessary adjustments to create a correctly exposed image. In manual mode, the settings you change directly affect the exposure. You set the power output on the flash and everything else you change from there (such as aperture and ISO) affects how bright the image is.
So, how can you affect the light with TTL? There are still two main ways that you can affect the light output despite being in auto mode. The first option is to change the exposure compensation.
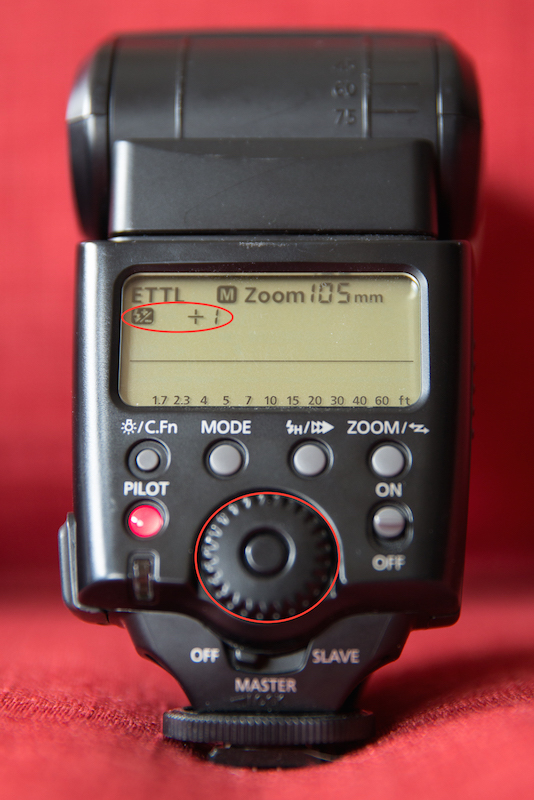
For most flashes, you will click the button in the center of the dial. Adjust the dial up or down to change the exposure compensation.
The second is to change your distance to the subject. That one is pretty self explanatory. The further you are from your subject, the darker it will be. The closer you are, the lighter your subject will be lit. Light gets lost in open space with nothing to illuminate or reflect off of.
Manual mode gives you two more options to affect the exposure. Changing the exposure compensation and distance affect the amount of light on your subject just like TTL. You can also affect the exposure with aperture and ISO on manual. You can use a nifty little acronym to help remember that for the future.
PAID
power, aperture, iso, distance
** Something that you might notice on your flash is Multi or Repeating mode. In short, this allows your flash to fire rapidly if you need to take a series of consecutive shots. However, you will probably lose some flash power. I'm not going to go into much detail on this, because you should probably focus on this mode once you've already mastered the other aspects of flash photography.

Zoom Function

Great, okay, so now you know the difference between TTL and manual. That was painless enough. We’re taking things in bite-sized steps here so that you can learn how to use flash without being overwhelmed. If you’ve messed around with some of the buttons on your flash, you’ve probably noticed the zoom function. What is that?
You can affect the spread of light by adjusting the zoom on your flash. The way it works is pretty intuitive. For example, if you set the zoom function to 24mm, the light is dispersed over a wider range to cover a wide angle shot. If you set the zoom function to 105mm, the light will be concentrated into a smaller range to create enough light for a telephoto shot.
You can get creative with playing around with the zoom function. Try setting the zoom to 105mm on your camera flash, but shooting at a wide angle - you might notice a spotlight effect.

Left: Lens - 24mm : Flash - 24mm (light is more widely spread across the wall and softer)
Right: Lens - 24mm : Flash - 105mm (light is more condensed and stronger)
Diffusion
You will hear this word constantly when referring to flash photography. Diffusion refers to the spread of light. Just like we talked about with distance, light gets lost in open space - that is effectively creating diffusion. If you bounce your speedlight off of a nearby wall, the light spreads out more which also creates diffusion. Diffusion is one of the most important elements to flash photography because it creates a soft light, which means there are less harsh shadows and your subject is lit more evenly and naturally. There are a number of different types of products you can mount directly to your speedlight, called modifiers, to help diffuse light from a flash.
We’re going to go over the 5 most common types of modifiers you might see being used with a speedlight.
Softbox
A softbox mounts directly onto your flash. It works exactly how you would expect it to. It’s a “box” with white fabric that diffuses the light, effectively creating “soft” light. Hence, softbox. This modifier is especially helpful with portrait photography to help flatter the face without harsh shadows.The bigger the softbox, the softer the light.
Reflector / Bounce
This modifier is typically a flat reflective white or silver reflector that you can velcro to the flash. Oftentimes you can bend the reflector however you need to. The terms bounce or reflector can be used interchangeably in this case since the purpose of this modifier is to reflect (bounce) the light from your flash and spread the light across more space in the opposite direction. Instead of flashing directly where you’re shooting with harsh, unflattering light.
Snoot
A snoot directs condensed light to one particular area. It’s kind of like a spotlight. This is a great modifier for creative and dramatic photos.
Lightsphere (Gary Fong)
This is a very typical way to diffuse your speedlight. Gary Fong is a brand but also refers to this type of modifier. This one looks like tupperware, the light from your flash has to pass through the opaque plastic which helps spread the light from all directions.
Plastic Diffuser
Most speedlights come with a small plastic diffuser when you purchase it. Light is dispersed from all directions. It helps diffuse the light, but since it’s still so small, you will typically still want to bounce off a wall or ceiling even while it’s mounted to your flash.
High Speed Sync (HSS)

If you’ve played around with your speedlight and digital camera settings, you might notice that you can’t go faster than a certain shutter speed without getting a harsh black line across your photo. By default, you shooting on the normal flash mode. Your shutter must be wide open as the speedlight flashes, otherwise you will see a black line. Your shutter wasn’t open long enough to fill the frame with light. In a lot of situations that’s not really a problem.
However, there may be times where you want a faster shutter speed. In that case, you can still compensate with high speed sync (HSS). High speed sync is kind of like continuous lighting, your speedlight is flashing rapidly so that you can use a faster shutter speed.
Now here’s where we might get a little bit more confusing… Shutter speed does not generally affect your exposure with flash photography especially since you can't go faster than 1/200 seconds while shooting with normal flash speed. However, with HSS, the faster your shutter, the darker your exposure will be if you remain at the same aperture. A benefit to HSS is if you want to get a more shallow depth of field with a wider aperture and a faster shutter speed so you don’t overexpose your image.

Left: Aperture - f/2.8 :: Shutter Speed - 1/500 sec (image is correctly exposed and everything but the mustache bunny's face is out of focus)
Right: Aperture - f/2.8 :: Shutter Speed - 1/200 sec (images is VERY overblown in order to blur out the background)
MASTER AND SLAVE
Okay, so that sounds terrible.
You will notice that your speedlight has a switch that goes from Off > Master > Slave. We're not going to go in depth with this, but it's good for you to know what that is. You can shoot with your speedlight off of your camera, changing the direction of light entirely. Some cameras and flashes can do this on their own by communicating over radio waves. However, in other instances you will need a tool (also known as a transceiver/receiver) to fire the flash remotely.
If you have multiple flashes set up remotely, one flash is the "Master" and that one triggers all the other flashes to go off. The other flashes? Those are the "Slave" flashes. I wouldn't spend too much time figuring out how that all works yet though.

Pilot Light

This one is pretty easy. Lets just make sure we have all of our bases covered. Your flash probably has a pilot button that lights up red (or green). If you push the pilot light, your flash should fire. This is an easy way to test your speedlight and make sure that it's working and syncing properly. Like we talked about above, if you have a set of flashes and you test fire the master flash, they should all flash in response. It's a simple check to make sure everything is communicating properly if you have multiple speedlights for your setup.
Flashes require time to recharge, and older flashes will generally take longer than the newer flashes on the market. Once that pilot light is lit up again, that means your flash is ready to fire. If you find yourself missing photos while shooting flash because the recharge time takes too long, you might want to try Multi Mode. We briefly mentioned this above, the flash will fire faster - but you will lose some output power so that the flash doesn't have to recharge as much.
Give it a Shot
Good work! You just plowed through some flash photography basics. You should go out and practice to put some of these tools to use!

Shot with three off-camera speedlights (each with a softbox attached). A great quick setup for photo booths!